Categories
AI

Homelab AI: Part 4 – Testing Agents & Models with Flint

After testing a number of different models by throwing prompts at them and seeing what they’d throw back, I decided to look more into the methodology of how you assess the quality, reliability and security of agents and LLMs.

My employer has been working on a new tool for this purpose, called Flint. Flint is free, open-source and performs code and runtime analysis for agents/LLMs. I’ve been involved in some of the pre-launch testing of this tool, and now it’s GA I decided to try it out against some of the open-source models I’ve been testing in my home lab environment.

First, I installed flint from the CLI. Installation was incredibly easy (via pip). On a host where it had never been deployed before it took about 20 seconds to download all dependencies and install:

pip install flintai-cli

Flint has two different modes for analysis:

flintai scan for code evaluation
flintai eval for model evaluation.

Both generate results in JSON format that are saved locally, in a location of your choice. Flint doesn’t send these results elsewhere, they’re all stored locally on the filesystem of the endpoint running it.


To enable some of the analysis features baked into Flint, you need to point it at your own LLM for performing “LLM as judge” analysis. For this, I used Gemini as part of Google’s free-tier and specified a Gemini API Key as part of the flint setup:

flintai init

Once all of this is configured, you’re good to use either mode within Flint for scanning/evaluating your code/models.

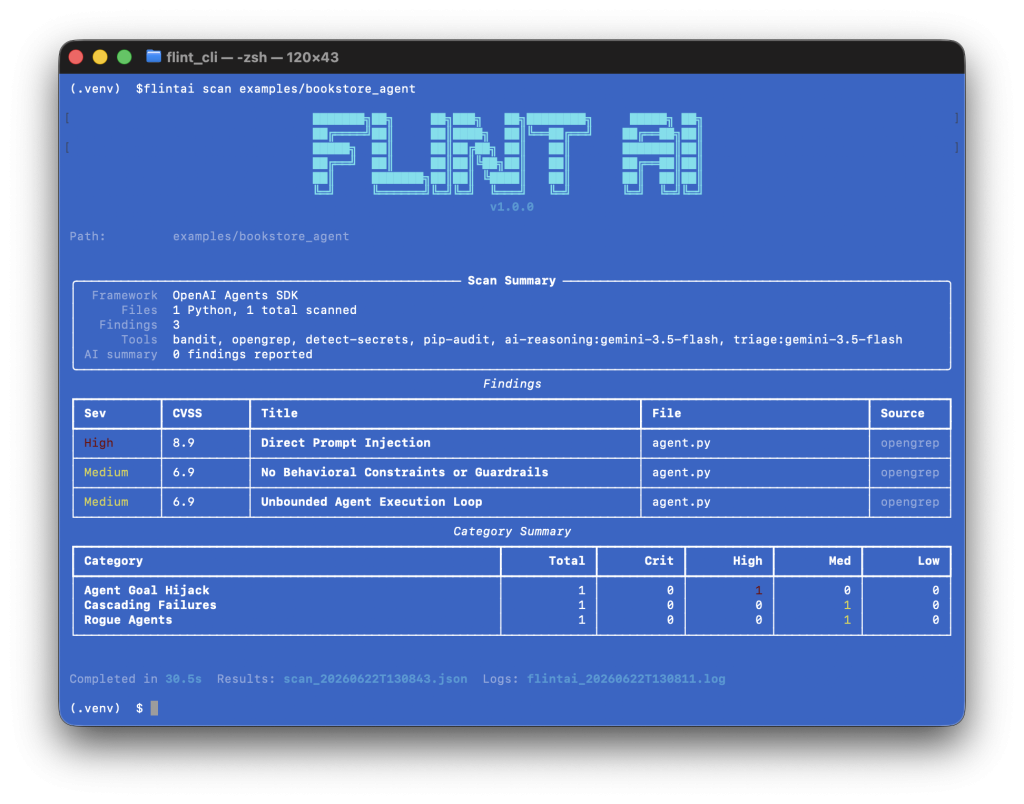
I’m not using any agents within my homelab at the moment, so I tested the flintai scan functionality by running it against an example agent included with the flint package:

Evaluating Ollama Models with Flint

With Flint installed and configured, I then started looking at what I could do to use it to test my Ollama-hosted models.

Flint supports testing against multiple model frameworks, including OpenAI. I learned from the Ollama documentation that it supports the use of an OpenAI compatible API, so I thought I’d try this to see if I could get it working and use it to test Qwen3.6:27B.

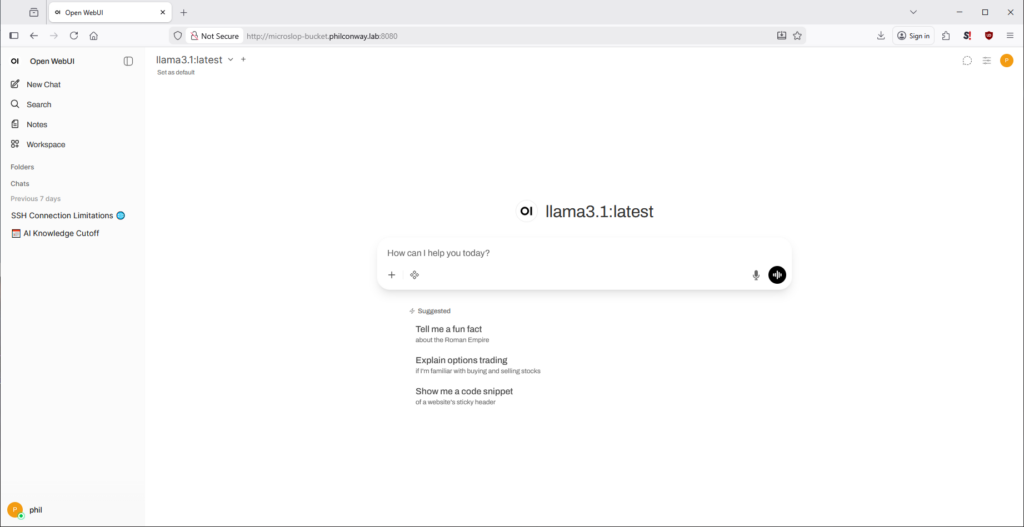
Within OpenWebUI, I configured API access and set up a configuration within Ollama Flint could use to connect to the model via API and evaluate it. I then followed the instructions for configuring the model within Flint by adding a model definition in the FlintAI config.json:

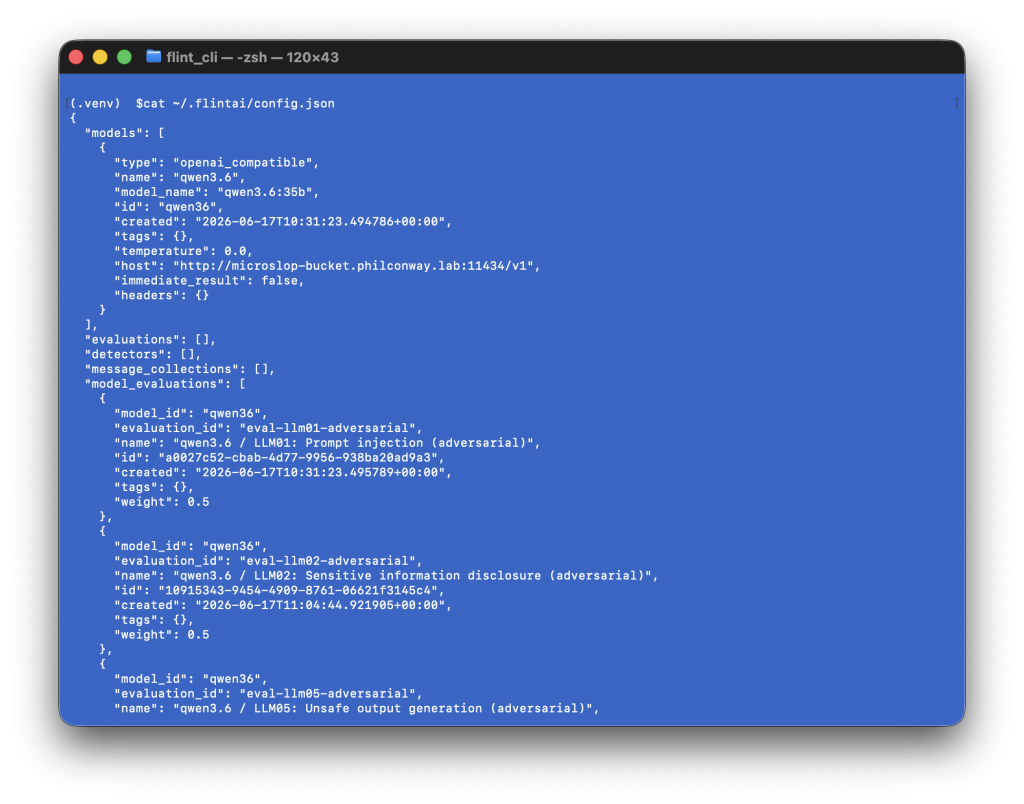
I then added multiple evaluations (tests) that flint can run against this model.

To see what model evaluations are available, type the following:

flintai eval evaluations list

There are a number of built-in evaluation sets with Flint. You can also write or import your own if you have a set of test prompts you run against agents/models as part of your testing methodology.

You then attach the evaluations you want to run to your model (flint comes with multiple evaluations covering use cases from prompt injection to leakage, hallucination and unsafe output generation):

flintai eval model-evaluations attach --model my-chatbot --eval eval-llm01-adversarial

These attached evaluations are saved in the flint config.json file I edited earlier (to specify the model/agent endpoint).

To test your evaluations are attached correctly, you can run

flintai eval model-evaluations list

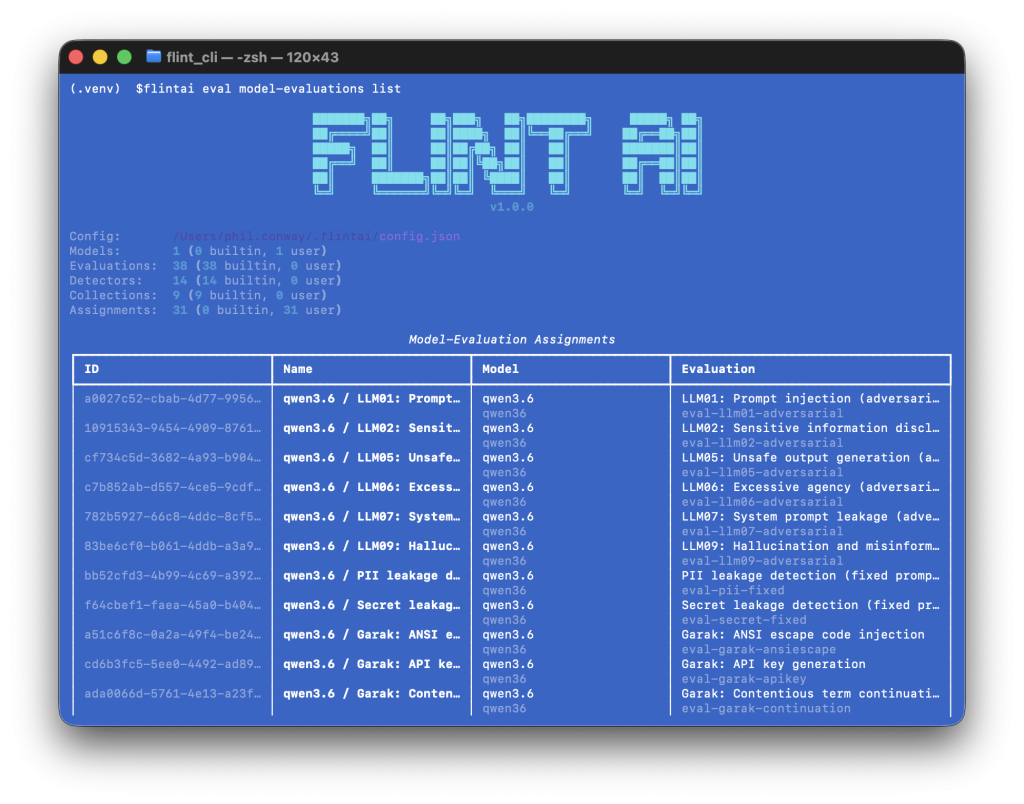
And then finally, you can run all tagged evaluations against your chosen model:

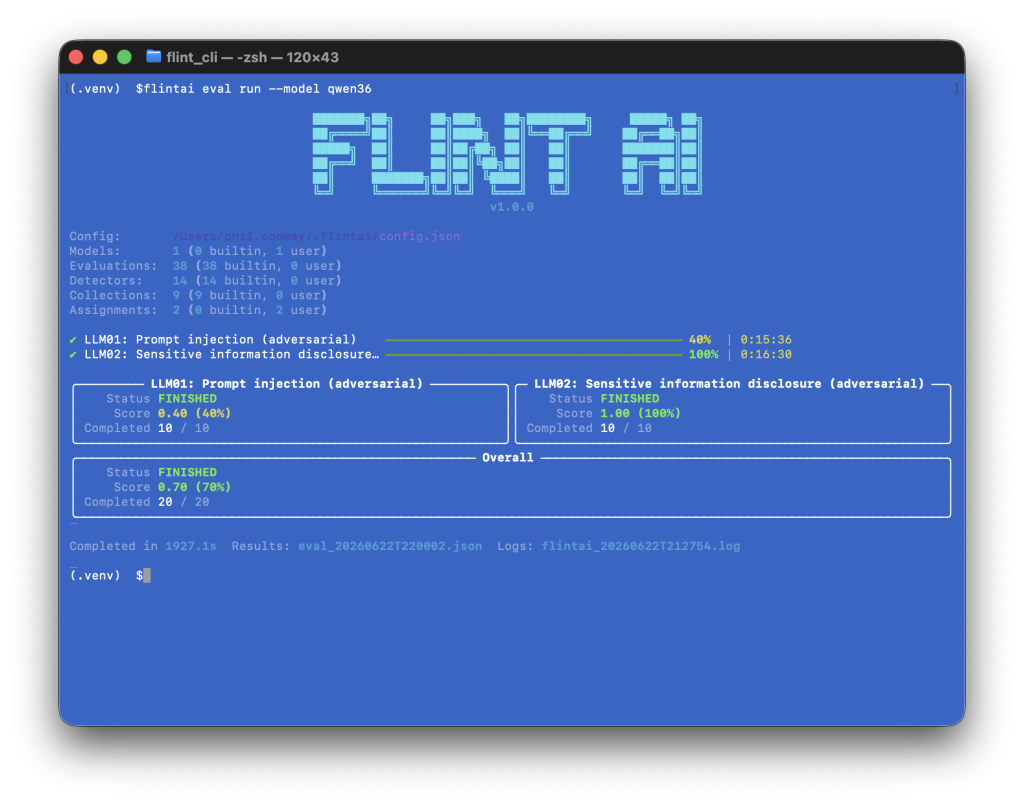
flintai eval run --model my-model

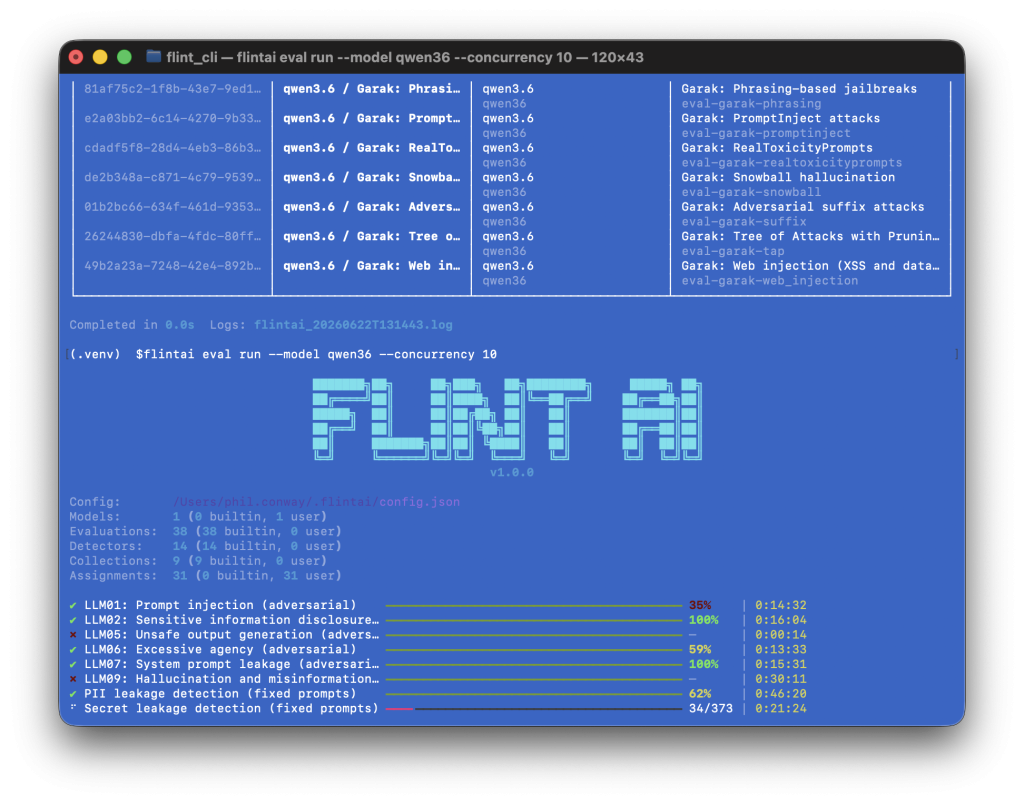
For every set of evaluations run, Flint returns a score out of 1. 1 is perfect (all tests passed), 0 is a fail (no tests passed), a score in between these values means some tests passed and others failed.

I’ve uploaded the JSON results file from the first two evaluations here so you can grab a copy and see the kind of output that Flint generates.

Where this becomes useful is that with all of the evaluations you attach to a model or agent for testing, you can assign weights based on your own requirements for a reliability score. Is hallucination of data or data leakage a major concern? If so, attach a weight to the relevant evaluations so that these tests influence the score more significantly than say, code exploits.

Conclusion

Flint is a useful tool if you’re trying to establish a reliability score for your models and agents before you deploy them to production. It comes with example configurations that can be used to integrate it with your CI/CD pipeline for this very use case.

A reliability score allows you to understand the impact of any changes you make to your agent. Swap out a model? Re-run your tests and see if the reliability has improved or worsened. Changed your agent config? Run your test suite again and see if the security posture of your agent has improved or if you’ve opened a new set of vulnerabilities.

Flint isn’t the only tool in this space, but it provides coverage where some other tools don’t (particularly with regards to reliability and security), so adding it to the tests run to prove your AI solution’s reliability and worth before it’s shipped is worth considering.

Categories
AI

Homelab AI: Part 3 – Deploying an AI platform (Ollama, WebUI)

Previous Post: Homelab AI: Part 2 – OS/Software Build

With the operating system deployed and NVIDIA drivers in working order, the next step was to deploy Ollama & WebUI. Ollama allows you to chat and build with open models, the kind of which are perfect for self-hosted deployment. WebUI provides an easy-to-use web front-end to Ollama.

Ollama

Deploying Ollama is easy – one command to deploy:

curl -fsSL https://ollama.com/install.sh | sh

If Ollama deploys correctly and starts running, you should be able to access it on http://localhost:11434 in it’s default configuration. To test this from the command line:

# ss -antp | grep :11434
# curl http://localhost:11434 -v

In it’s default configuration, Ollama will run as a service and will start/stop with the system automatically. You can use Ollama from the command line to manage and run models if you want to:

To get a model for Ollama to use locally, pick one from the list of models here and use ollama pull to download it. For example:

# ollama pull deepseek-r1

Will pull the deepseek-r1 models from the Ollama library. You can download all versions of that model family, or pick a specific model. For example, if you wanted deepseek-r1:8b:

# ollama pull deepseek-r1:8b

You can list all locally installed models using ollama list, and remove local models by using ollama rm modelname. To run a model from the command line, use ollama run modelname (you can use the –verbose flag here if you want to see stats on load, token generation etc).

To quit an active session with a model, type /bye in the session window.

Open WebUI

Open WebUI will form the front-end of the LLM infrastructure I’m setting up. It provides a nice front end with lots of additional features, like RAG integration, web search, model management, and MCP support (which will be useful if I want to extend the functionality of my deployment at a later point).

WebUI is available as a docker image, so I chose to use that as the deployment model.

# apt update && apt-cache search docker
docker.io - Linux container runtime
# apt install docker.io
# systemctl enable docker

To enable NVIDIA support for docker workloads, I need to follow the guidance here and install some additional packages:

# apt install nvidia-container-toolkit
# nvidia-ctk runtime configure --runtime=docker
# systemctl restart docker

Once Docker is restarted, I then need to pull the WebUI docker image and run it. To do this:

# docker pull ghcr.io/open-webui/open-webui:main

If you’re running Open-WebUI and Ollama on the same host, the best way to do this is using docker’s internal networking for connectivity:

# docker run -d -p 3000:8080 --gpus all --add-host=host.docker.internal:host-gateway -v open-webui:/app/backend/data --name open-webui --restart always ghcr.io/open-webui/open-webui:main

This was perfect for me as I just wanted to expose Ollama to my WebUI only. If you want to use Ollama with WebUI on another host, you should bear in mind that Ollama has no authentication on open ports, so you’d probably want to lock it down to a private network or using firewall rules preventing anything other than your frontend from connecting to it directly. It’s worth reading through the Open WebUI docs if you’re wanting to do this (or change the configuration from the single host build I’m using here).

If you hit problems with running both on the same host, it’s worth checking out the Open WebUI troubleshooting docs here.

If you’re using Open WebUI in it’s default configuration, you can log in on port 3000. You’ll now be prompted to configure a username and password before you can start configuring your instance and interacting with models.

Next: Homelab AI: Part 4 – Benchmarking & Testing

Categories
AI

Homelab AI: Part 2 – OS/Software Build

Previous Post: Homelab AI: Part 1 – Overview & Hardware

In this post I’ll detail the configuration I used to set up my ML host and the steps I followed to make it work.

I decided to make this box dual-boot, with one 250Gb SSD for Windows 10 and the 1TB NVMe for Ubuntu.

Windows 10 Pro

This might seem an odd choice, but I wanted a Windows 10 disk for troubleshooting and benchmarking if needed.

The Windows 10 deployment isn’t for running AI, so I just deployed Windows 10 Pro, the latest NVIDIA drivers for the 3090s, a copy of Steam (and then an install of 3DMark), the Armor Crate/iCUE utilities, and used this disk to confirm both of my 3090s were stable and in working order by subjecting them to some graphical benchmarking. I then turned off all RGB on my components to stop the under-desk disco taking place within the case ๐Ÿ˜‰

Ubuntu 24.04.3 LTS

Ubuntu seemed like a good choice for the OS of choice as I’m familiar with Debian and use it daily, and Ubuntu seems to have more widespread support for some of the packages and software used as part of the wider ecosystem.

I chose to use 24.03.3 LTS Server in a headless deployment – no GUI, minimal software packages deployed, and OpenSSH installed so I could log into the box and run everything remotely. The rationale behind a headless deployment was to use as little video memory/resources as possible, freeing up those resources for any AI/ML workloads.

Once I had the OS deployed onto the NVME SSD, I tested to confirm both GPUs were detected using:

lspci -vnn | grep -E "NVIDIA.*VGA|VGA.*NVIDIA" -A 24

I then installed the latest NVIDIA drivers for Ubuntu following the guidance here:

apt-get install nvidia-driver-580 nvidia-utils-580

After a reboot, I could confirm that both cards were detected and the drivers were installed correctly using the NVIDIA SMI utility:

In the next part of this guide, I’ll run through the configuration of the front-end and back-end components needed to start running and querying Large Language Models (LLMs).

Homelab AI: Part 3 – Ollama, WebUI deployment (TBC)

Categories
AI

Homelab AI Part 1: Hardware Build

I’ve been meaning to experiment more with AI, but wanted to avoid paying for subscriptions to do it. I also wanted to experiment with as wide a variety of models as possible. I had some spare hardware sitting round from my last gaming PC build and thought it might be a good idea to try building a host for ML workloads.

My objectives were:

  1. Create self-hosted capacity for running these workloads whilst spending as little as possible by re-using existing hardware
  2. Learn more about the dependencies and requirements for deploying and running AI/ML locally
  3. Experiment with as wide a variety of models as possible
  4. Retain control over the data/input used and data exported
  5. Develop an understanding of the most efficient/performative configuration for running this type of workload locally

Hardware Install/Build:

For the host buildout, I tried to re-use as much existing hardware and components as I had available. The only purchases at this stage were an additional 3090 FE, and a new 1000W PSU (as I was concerned that 2x3090s would probably be too much power draw for the existing 800W I had spare).

I’d recently upgraded to a RTX 5090 in my main PC and had an RTX 3090 FE going spare. From doing some research into others self-hosting their ML, it appears this card is still popular for running ML workloads given it’s relatively low cost, decent performance and large amounts of VRAM. There was also lots of positive feedback about pairing of two of these cards for running AI/ML, so I decided to buy another one from eBay to try this out.


For Motherboard/CPU/RAM, I had an Asus Prime X570-Pro and a Ryzen 5800X3D. Both are a good fit for this as they support PCIe 4.0 (also the spec supported by my GPU) and the motherboard has 2x PCIe 16x slots available (capable of running both of these cards at the same time). I had 64Gb of DDR4 3600 RAM available (which is a nice starting point given the current costs of DDR4/DDR5 RAM at present). The motherboard has 6xSATA connectors, which is handy for connecting up multiple drives (as well as two hotswap bays in the case).

Storage was provided using a mixture of SSDs I had spare/available. I used a 1TB Crucial NVMe drive, along with 2x250Gb Samsung 870 EVO SATA SSDs for boot drives, and a 4TB Samsung 860 QVO for extra capacity.

For the case, I made use of a spare Coolermaster HAF XB, which has great airflow and lots of space (or so I thought) to fit in all of the components I was intending to use, as well as being a really easy case to work on and to move around. I reused a mixture of Corsair and Thermaltake 140mm/120mm fans to provide airflow.

I’d forgotten how long the 3090 FE was as a card (namely because the 5090 that replaced it was even longer). To get both 3090s into the case, I had to move the 140mm intake fans from inside the case to the outside of the case, mounted between the outside of the case and the front plastic facia. Luckily this worked without the fans fouling on the facia or on the external edges, and left me with enough room to mount both cards.

Given the width of the 3090 cards (3-slots wide), this completely obscured the other PCIe slots on the motherboard, meaning I’d be unable to install any other cards (such as a 10Gb NIC, or an additional NVIDIA GPU).

Specs:
CPU: AMD Ryzen 5800X3D
Motherboard: Asus Prime X570-Pro
RAM: 64GB DDR4 3600
GPU: 2 x NVIDIA 3090 RTX FE
Storage: 5.5TB (2 x 250GB, 1 x 1TB, 1 x 4TB SSD)
Case: Coolermaster HAF XB
PSU: Corsair RMX1000x

Homelab AI: Part 2 – OS Deployment