Categories
VMware

vSphere 8.0 with Legacy Hardware

It’s been a few months now since vSphere 8.0 was released, so I decided to bite the bullet and try upgrading my hosts in my homelab. I thought I’d share my experience here for anyone running older (Sandy Bridge/Westmere Xeon) hardware in their homelabs who are thinking of doing the same.

vCenter Upgrade

Upgrading to vCenter 8 was fairly straightforward, only blockers to this was my install of NSX-V 6.14 (I used this to test NSX-V > NSX-T migrations) and a single host (HP Microserver N40L) stuck on vSphere 6.5, the last version of ESXi supported by this hardware. Both were flagged up by the VCSA installer at my first attempt.

With NSX-V removed and the single outstanding 6.5 host decommissioned, everything upgraded smoothly from a vCenter perspective.

Upgrading vSphere on HP Gen8 Hardware

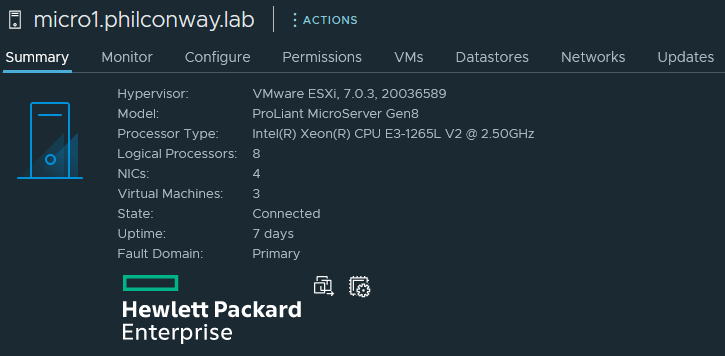
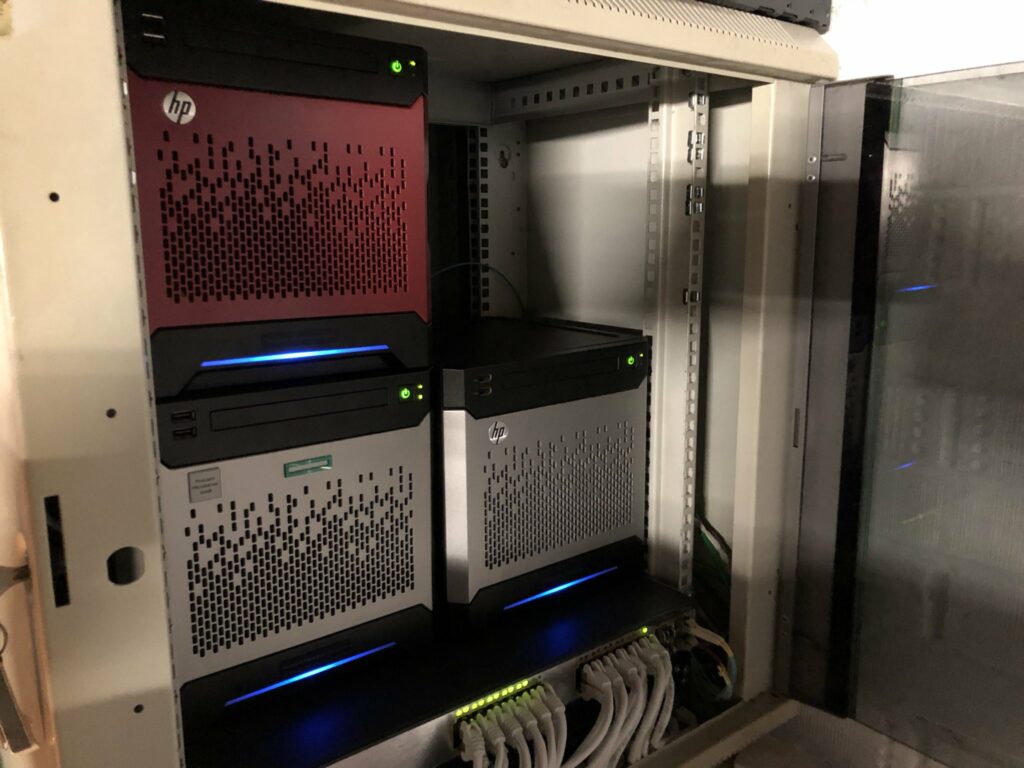
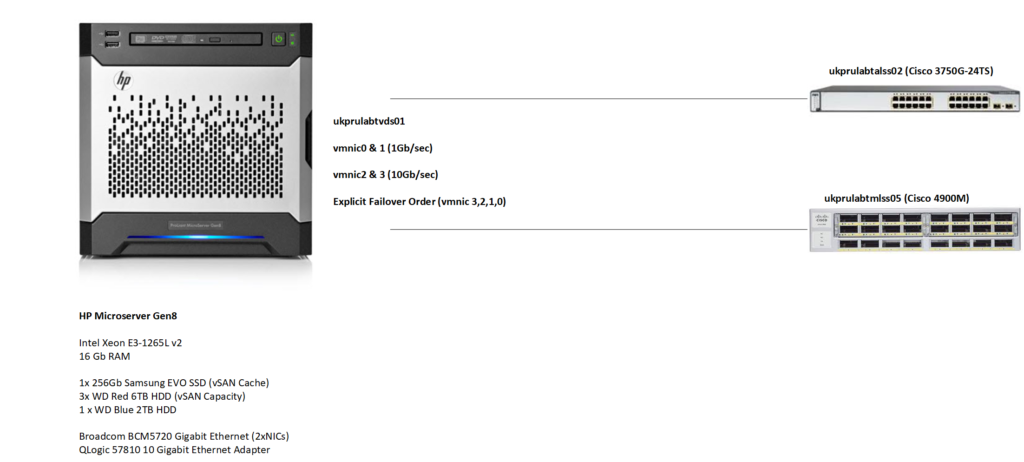
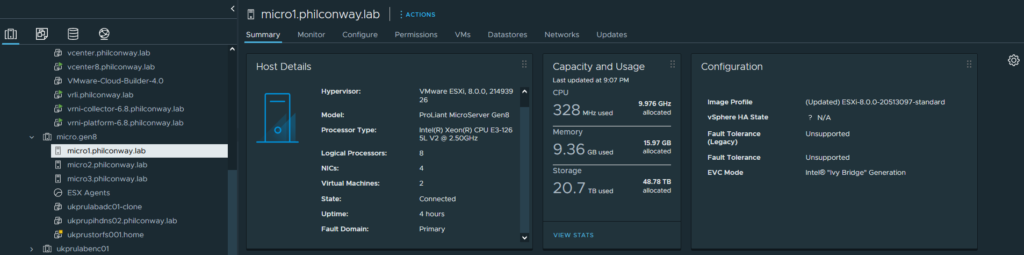
Next on the list was upgrading the hosts. I decided to start with my HP Gen8 Microservers (running Ivy Bridge Xeon E3-1265L v2s).

These CPUs are no longer supported, however the use of “allowLegacyCPU=true” as a boot option for the vsphere install (Shift+O on boot to set this) bypassed the check and allowed for an upgrade to take place.

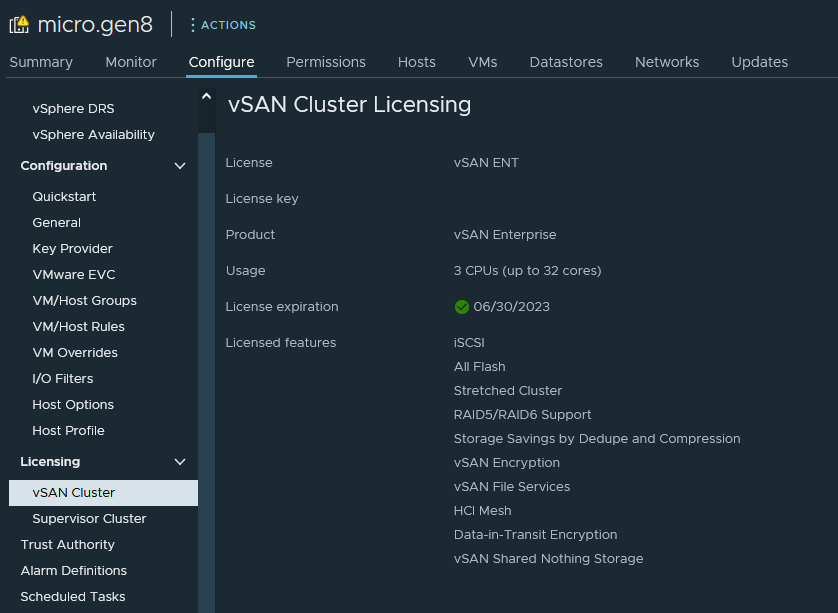
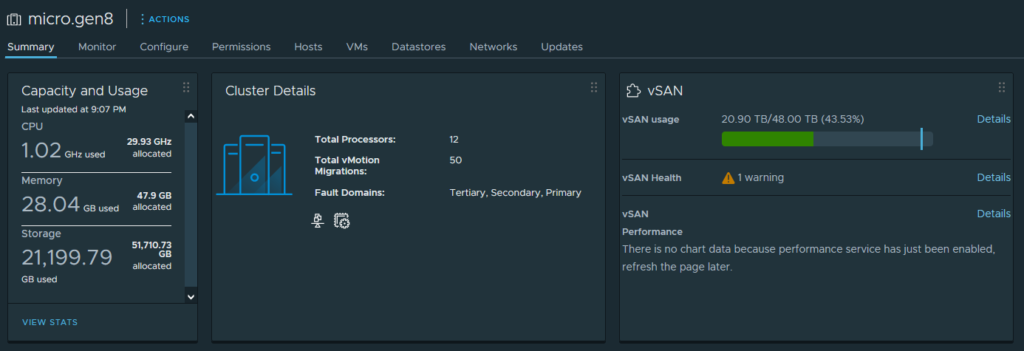
Surprisingly, the upgrade process completed on all three Gen8 hosts successfully with no issues. A quick check of all hosts post-install showed all hardware being successfully detected and working correctly.

Upgrading my two HP DL380 Gen8s to vSphere 8 was a similar process – all hardware detected and working correctly.

Upgrading to vSphere 8 on DL380 G7

I have a pair of DL380 G7s running on Westmere CPUs (E5620s), with 128Gb RAM and 4TB of storage. I decided to try one to see how it fared with the new vSphere version.

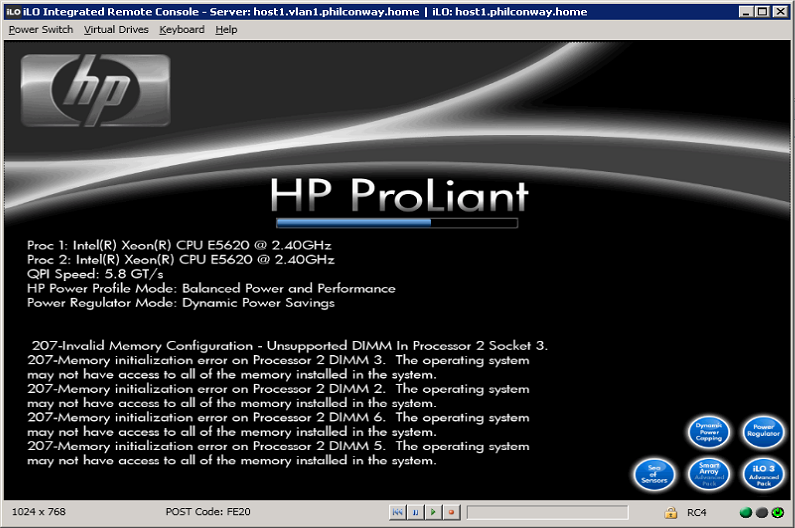
The first problem – due to not being powered on for a while, this particular box had trouble seeing it’s memory. Taking the cover off, removing the DIMMs, wiping the contacts and spraying some air cleaner into the sockets seemed to fix this ๐Ÿ˜‰

The install process seemed smooth enough – no warnings about unsupported hardware apart from the CPU:

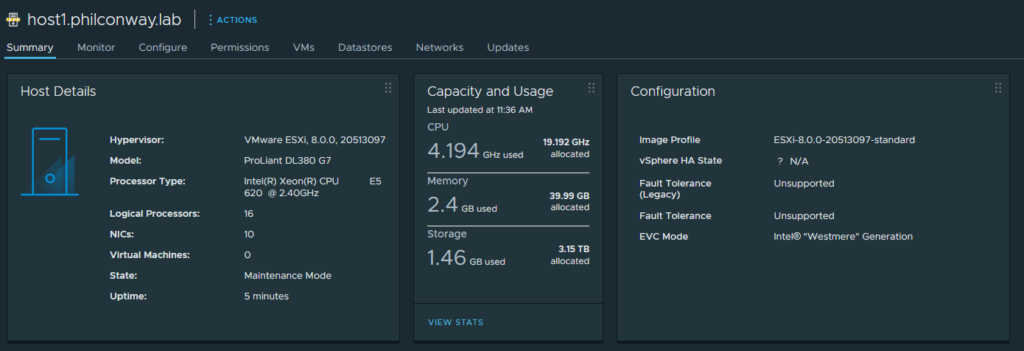
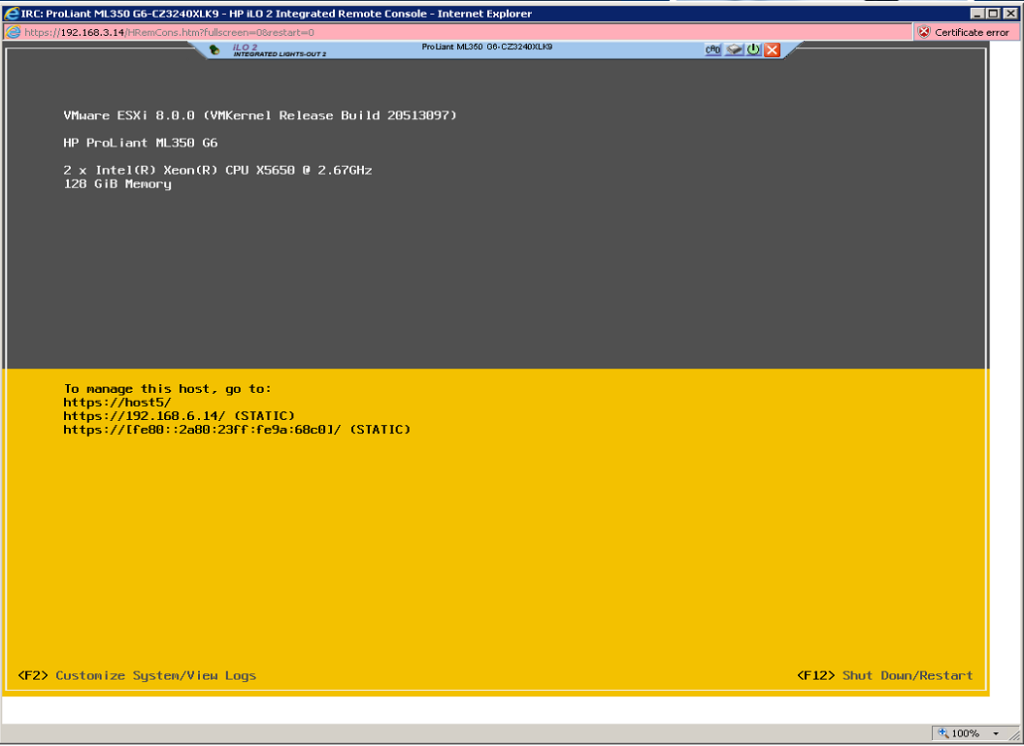
After upgrade and reboot, the box booted up successfully:

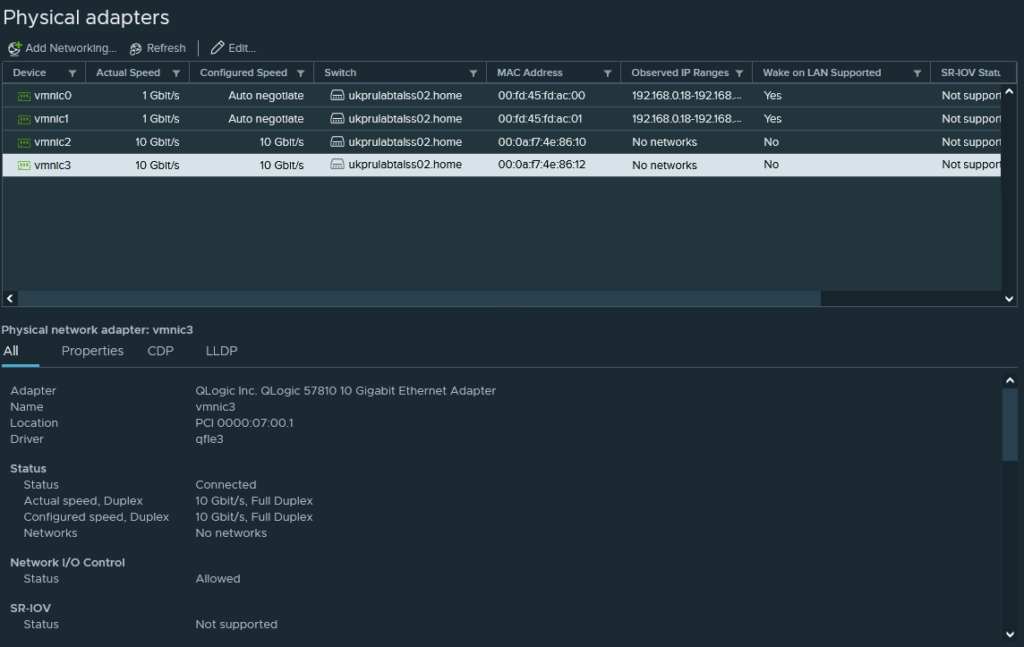
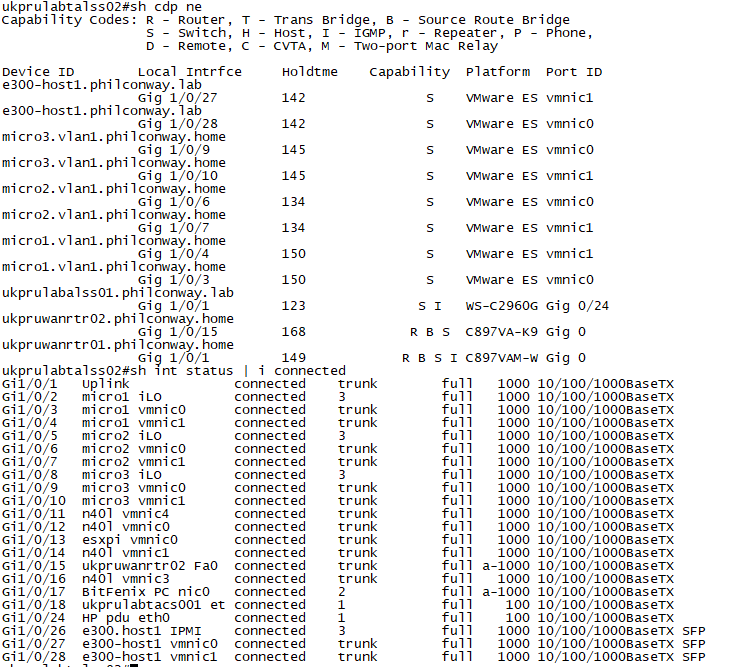
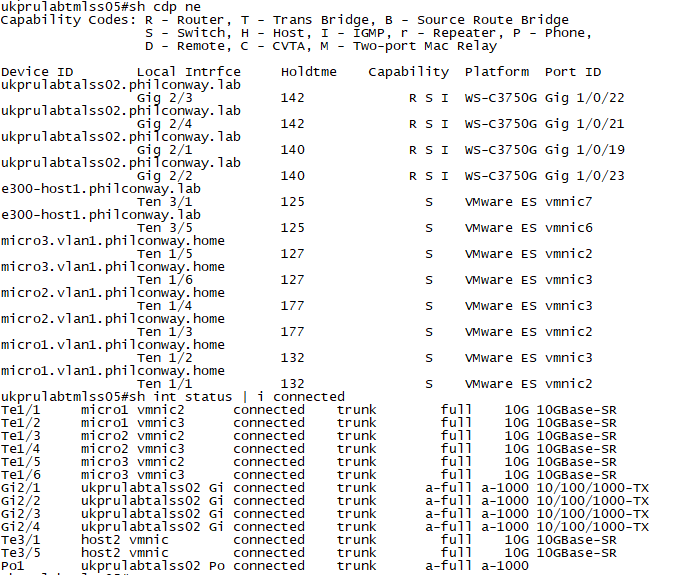
A quick check through vCenter shows all hardware detected and working successfully, including the multiple network add-in cards – Both the Intel 82571EB (4x1Gb) and QLogic 57810 (2x10Gb) showing up correctly.

Upgrading to vSphere 8 on HP ML350 G6

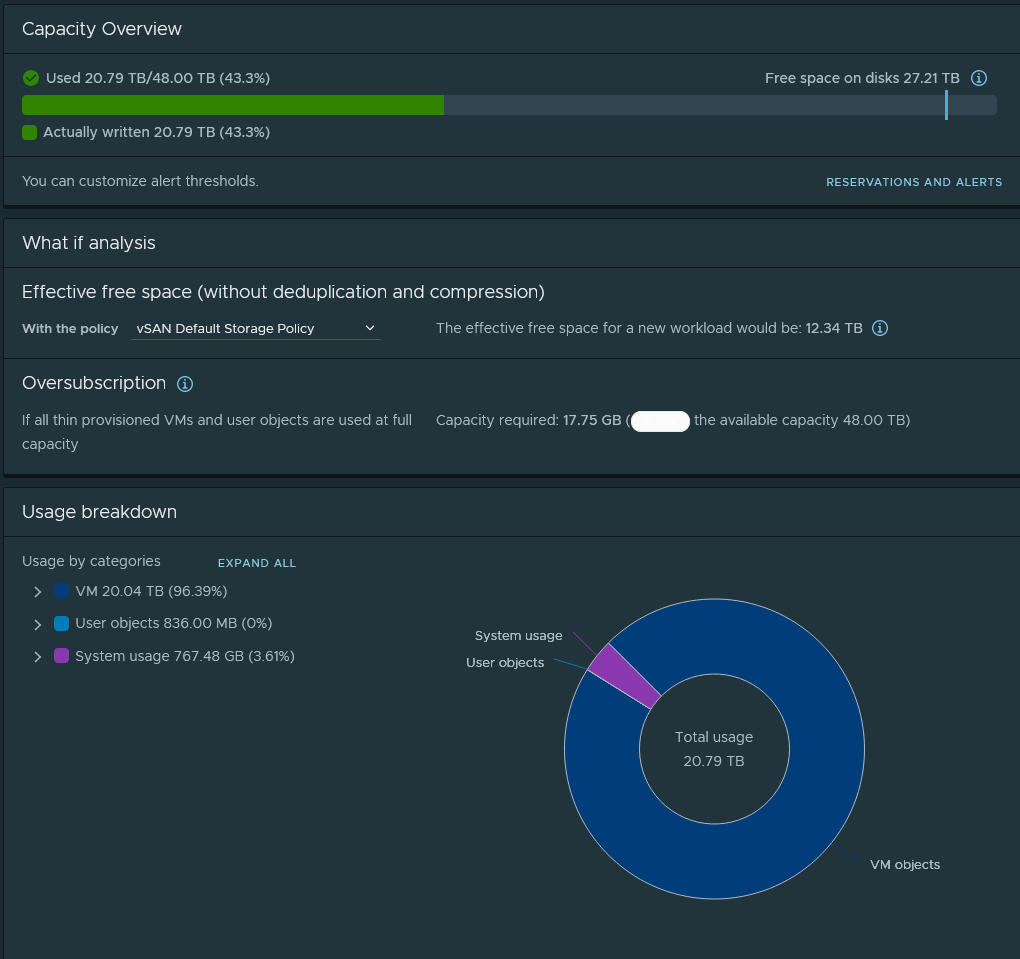
I thought that upgrading older hardware might prove more tricky. In my home lab I have a single ML350 G6, a server masquerading as a tower desktop PC. This box has 128Gb RAM and 15TB of storage, so it’s something I’d like to keep running on a recent version.

The ML350G6 originally had a pair of Nehalem E5520 CPUs. Nehalem shares the same CPU socket as Westmere, making a Westmere-based Xeon an easy drop-in upgrade (and adds AES-NI instruction sets as well as improvements for virtualisation), so I swapped this out for a pair of X5650s a few years back.

Upgrading this box to vSphere 7 resulted in the loss of the onboard NICs (luckily this particular server had additional NICs via an onboard card so everything continued to work after some quick repatching).

Running through the vSphere 8 installer resulted in the following error during pre-checks:

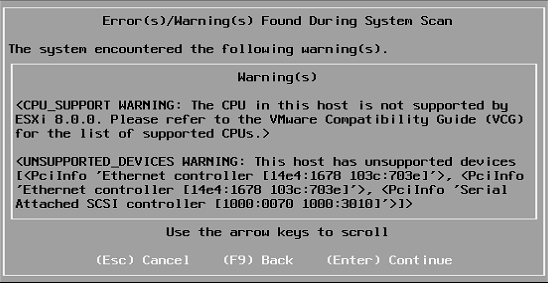
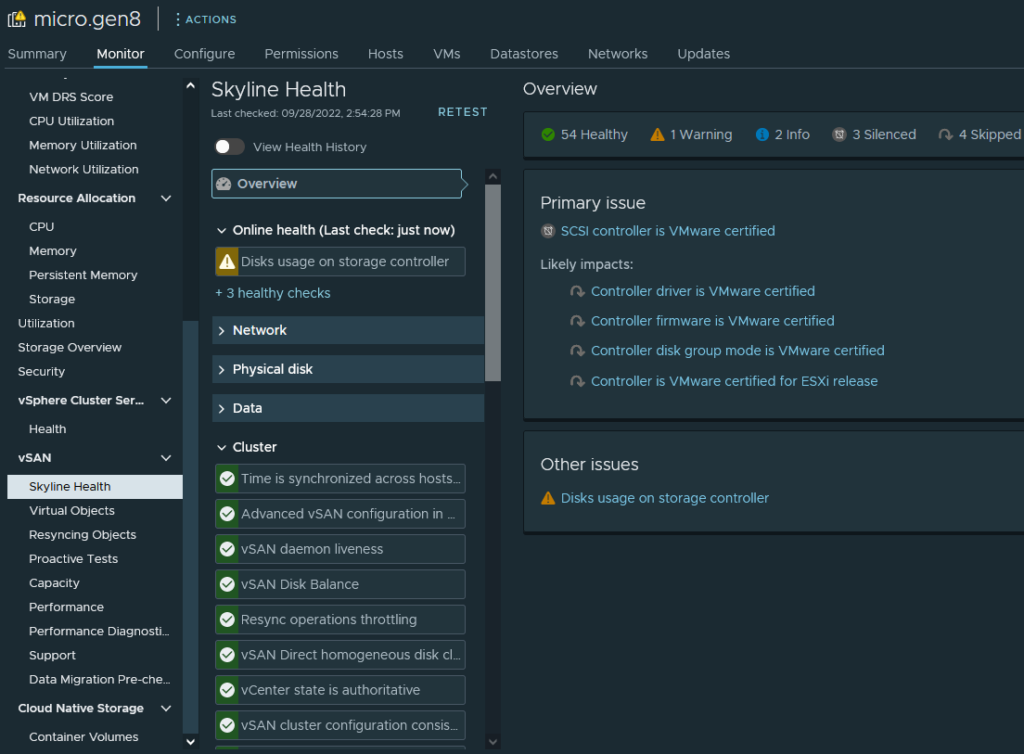
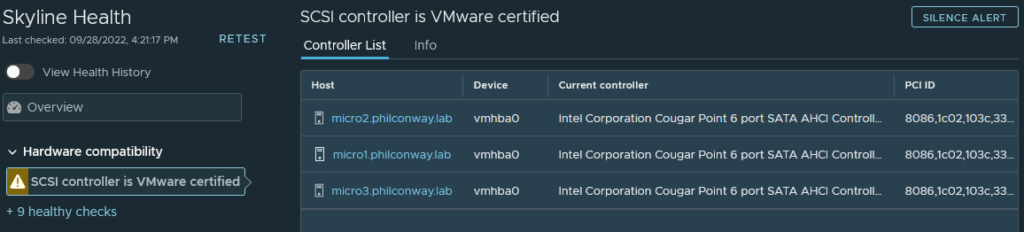
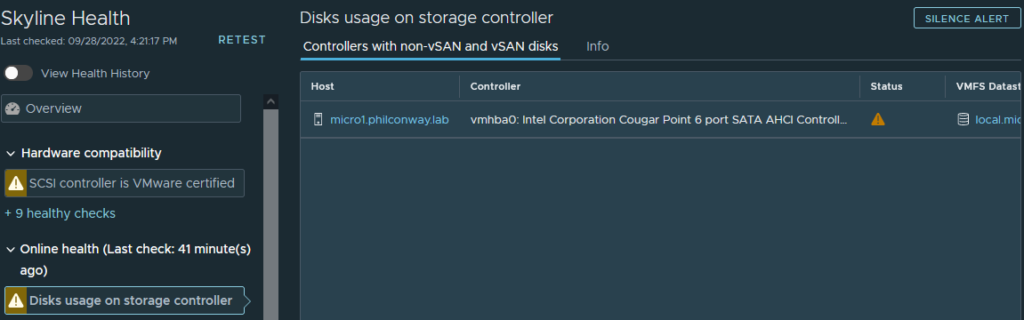
The CPU and NIC warnings were to be expected, I hoped the errors relating to the SAS controller are the add-in LSI board used for this server’s tape drive and not the built-in controller used for RAID/storage.

The server completed upgrade successfully and rebooted without issue.

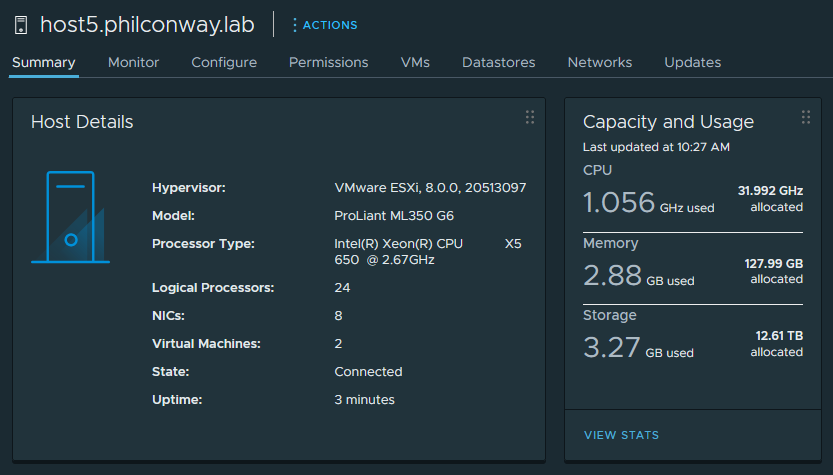
After running through some quick checks in vCenter, it appeared the box was running correctly with all hardware detected (apart from the onboard NICs and the add-on LSI SAS card).

Summary

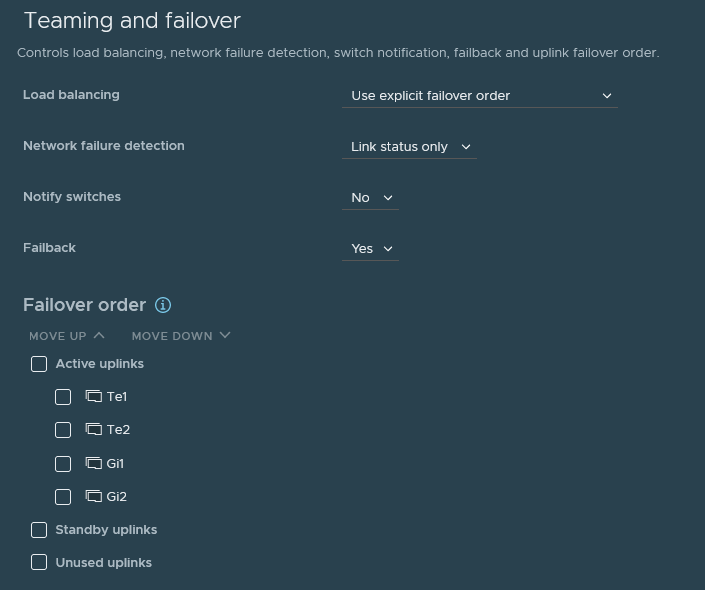
For me, it was worth upgrading these boxes due to their decent storage and memory provision, as it prolongs the life of these servers and their usefulness in a lab capacity, but not without the loss of functionality in certain cases. I lost some onboard NICs, but due to having lots of additional NICs available (due to mucking around with uplink configurations for N-VDS/vDS & NSX), this is something I was able to work around very easily.

The experience when upgrading legacy hardware to vSphere 8 for lab use varies massively. Depending on the platform in question, whilst the CPU may support the hypervisor with some warning suppressed, it’s entirely possible (and highly likely) that the support of peripherals and additional hardware will determine the viability of any upgrade. Whilst common, popular hardware like HP 410i storage controllers and Intel X520 NICs seem to work without issue, don’t be surprised if more niche hardware or onboard components are no longer supported (and may require workaround or replacement in order to upgrade to vSphere 8). At this point it might be easier/cheaper to invest in new hosts ๐Ÿ™‚

Categories
VMware vSAN

homelab vSAN on vSphere 7.0 โ€“ Part 6 (Review / Lessons Learned)

After setting up my vSAN instance and deploying a test workload (a large VM that synchronises everything from my home PC and laptop using Resilio Sync), I noticed that disk throughput was far below what I’d expect (indicated around 3-4MB/s). Looking at the vSAN performance metric (Monitor>vSAN>Performance), I also noticed the following:

1) Latency would spike wildly from 5ms up to 3000ms (!!!!)
2) Congestion was randomly spiking
3) Outstanding IO was regularly 100+
4) IOPs was 100-300
5) Backend throughput was usually below 10MB/s.

Granted, this is a lab environment using non-standard hardware, but I decided to do some digging and try to determine the possible cause (and if there was something I could do to address it). Here’s what I found:

Capacity Disk Types

My capacity tier was a mix of disks (all identical in capacity but from different vendors). Most of these disks were SMR (Shingled Magnetic Recording). SMR disks use data tracks stacked on top of each other to increase density, however for modification/deletion of existing data, this means all of the stacked data in a single sector needs to be re-written (which has a performance penalty associated with it). SMR disks normally have a large cache which is used to overcome this limitation (and prevent drops in throughput), however this cache fills up under sustained writes, causing a massive drop in throughput.

SMR disks wouldn’t be used in an enterprise environment – they’re common in domestic use because they are cheaper than conventional magnetic drives (CMR). They’re intended for archival/intermittent use, rather than throughput-heavy applications.

To address this, I swapped out the entire capacity tier, replacing all disks with a single Seagate Exos 18TB CMR drive per host. These are enterprise-grade disks designed for handling sustained/heavy throughput.

Host Disk Controller Type / Queue Length

Another important link in the vSAN performance chain is the Disk Controllers used. vSAN has minimum requirements around Disk Controllers, with a queue length of 256.

The HP Microserver Gen8 (my platform of choice for this vSAN cluster), uses the HP B120i Disk controller. From Duncan Epping’s vSAN blog post about Disk Controller queue depths, it’s been documented that this controller has a queue depth of 31 and doesn’t meet the vSAN minimum requirement (and would be an unsupported configuration).

I could address this by fitting an upgraded disk controller to each host, but as the Microserver only has one PCIE slot, I’d need to remove the 10Gb NIC from each server accordingly to make this work. I want to retain the extra pNICs for NSX, so this isn’t an option.

Some further reading on why queue depths matter and why they can impact a production environment is here, from an RCA of an outage in a customer’s environment.

Network Fabric/Connectivity

Looking at the pNIC metrics (Monitor>vSAN>Performance>Physical Adapters), it was also apparent that there was a number of packet errors being shown – there was dropped packets being indicated across the active vSAN NIC on each host. When I logged onto the network switch connecting these hosts, I couldn’t see any input/output errors on the interfaces, but I could see output drops. Clearing the counters resulted in the numbers incrementing straight away, so this is an ongoing problem rather than a historical one:

Running a “show mls qos int gi1/0/3 statistics” showed lots of drops in queue3:

What does this mean to a non-network guy? An explanation follows ๐Ÿ™‚

The switch I’m using to provide network connectivity to these hosts is a Cisco 3750G (WS-C3750G-24TS-1U). This is a Gigabit-capable L3 switch, first released in 2003 (and went EOL in 2021).

This switch was intended as a LAN access switch for branch/campus use, rather than as a datacenter device. As a result, it was never intended or built to provide capability to support high-throughput applications. Compared to modern devices, it has small buffers and limited QoS (quality-of-service) features that can be used.

Reading up, it appears I’ve hit a common issue with this switch. Hammering lots of traffic through the NICs causes the buffers to be overwhelmed and for traffic to drop. The buffer size cannot be increased, and enabling QoS would cause the switch to reduce the buffer size by allocating memory for QoS use (all of the articles I’ve found regarding this issue recommend disabling QoS for this reason).

When I repatched all of the pNICs to my other lab switch – a Cisco 4900M (a switch designed for datacentre use), this issue disappears. Using either the Gigabit or TenGigabit NICs, the cluster can hammer traffic across the interfaces for days without a single drop being recorded.

Impact of changes

Replacing the disks and the network switch resulted in a latency decrease to under 50ms, a throughput increase to over 100MB/sec and a drop in congestions and dropped packets. There was still a substantial amount of outstanding IO recorded regularly, but I’d put this down to the lightweight disk controller (which I can’t really replace without sacrificing network connectivity).

Conclusion

Whilst vSAN is a software-defined SAN solution, the performance and stability of it is very much dependent on the hardware used, not just from a host perspective (disks, memory, processing power, disk controllers, NICs etc) but also from a network fabric perspective – issues with the configuration or provision of your network fabric can adversely affect the performance of your storage.

Categories
VMware vSAN

homelab vSAN on vSphere 7.0 โ€“ Part 5 (vSAN Skyline Health/Ops)

One of the really neat features I liked about vSAN in vSphere 7 was Skyline Health. This gives you a helpful view for each vSphere cluster of every aspect of configuration or requirement that might affect the availability, stability or performance of your vSAN service.

Skyline runs through a series of automated checks against networking, disks, data and cluster configuration, as well as capacity, performance and compatibility info. Where it finds issues, they are highlighted to the end user allowing them to take corrective action.

As an example, here are the network checks, all in the green (which you can imagine is a relief to a network guy ๐Ÿ˜‰ Picking latency as an example – Skyline runs a series of automated tests between each host in the cluster and alerts if the network latency is greater than 5ms. In this case it’s under 0.2ms, so nothing to worry about here…

Picking an example of one of the areas where there is an issue with my cluster – the SCSI controller in all three hosts isn’t VMware certified. This isn’t entirely a surprise – HP never submitted the Gen8 Microserver for vSphere 7 testing/certification and probably never intended for customers to run vSAN on it, so the SATA controller isn’t tested and certified as a result. In a production environment this wouldn’t be acceptable, for a home environment it’s fine if you’re prepared to accept the risk. This cluster has been running in this state for a couple of years now with no data loss incurred.

The only other issue flagged up was that I have vSAN and non-vSAN disks on the same controller on micro1. From a vSAN best-practice perspective this is a no-no, I did it deliberately to show what happens from a Skyline perspective when you start to deviate from best practices:

Seperate from Skyline, there are a series of menus available allowing you to check the capacity and performance of your cluster. This is really useful in allowing you to determine how much storage you have left, based on the objects, hardware and storage policies you have configured.

You can also look at the health of your virtual objects (virtual disks, VM components etc) and determine where they are placed, right down to the individual disk on each host they reside on. This is useful if you’re troubleshooting issues with a host or disk.

You can also look at Resyncs – any action prompting vSAN to resync objects between hosts in the cluster. Nothing to see here unfortunately.

Categories
VMware vSAN

homelab vSAN on vSphere 7.0 โ€“ Part 4 (vSAN Configuration)

Select your cluster, then go to Configure>vSAN>Services. Click “Configure vSAN”.

You’ll need to choose the type of vSAN cluster to configure:

1) Single Site Cluster (with or without custom fault domains)
2) Two-node Cluster
3) Stretched Cluster
4) HCI Mesh Compute Cluster

All of these choices affect the redundancy and capacity of your datastore, something we’ll cover later in this chapter.

I chose to use a Single-site cluster with custom fault domains.

For my 3-node cluster, I create 3 domains, one containing each host. My configuration allows for one host failure to be tolerated by vSAN.

The Fault Domains have an impact on the amount of storage available. The more failures you set up your vSAN instance to tolerate, the more storage it will reserve for redundancy (and you’ll end up with less total storage on your vSAN datastore as a result).

Conversely, if you set up your vSAN configuration to allow for the maximum storage possible, this will leave you with reduced redundancy in the event of a failure.

Then click “Next” to choose the vSAN services to use. In this lab instance I’m just using basic vSAN datastores, none of the additional services.

Claim disks for capacity and cache for each of the hosts that are going to provide vSAN resources. Each host needs at least one flash device, and at least one capacity device.

In my case, I add the 256Gb SSD as cache, and the 18TB of disks as capacity for each host.

Review the configuration and click Finish.

With Disks allocated and Fault Domains configured, you should end up with a vSAN datastore for your cluster.

Categories
VMware vSAN

homelab vSAN on vSphere 7.0 – Part 3 (Preparation)

vSphere Configuration

All three hosts intended to be part of the vSAN cluster are running the same version of vSphere/ESXi (7.0.3f).

EVC is enabled and configured for Ivy Bridge (matching the CPU generation). DRS is set to Partially Automated.

All hosts are part of the same common vSphere Distributed Switch (version 7.0.3). VLAN 6 is reserved for vSphere host management, VLAN 10 is used for vMotion, vSAN and storage-related traffic. The vDS and all associated port groups have an MTU of 9000. The same value is configured on both lab switches that form the physical network fabric.

The vDS is backed up by 4 NICs on each host – vmnic0/1 using the Microserver’s onboard 1Gb Nics, and vmnic2/3 using the QLogic 10Gb adapter. These are mapped to Gi1/2 and Te1/2 respectively within the vDS (to make it easier to tell the different speeds of NICs apart at a glance).

These are configured in explicit failover order so the 10GB NICs are preferred when the lab’s 10Gb switch is powered on.

CDP is enabled on all hosts and both switches to assist with troubleshooting (in production you’d probably want this turned off).

Each host has 3 vmknics, 1 for management, 1 for vMotion/vSAN (if this wasn’t a lab environment you’d want these split into seperate vmknics) and 1 for VXLAN (NSX). The vMotion and VXLAN vmknics have an MTU of 9000, are configured for DHCP (the lab management switch acts as a DHCP server).

The cluster is licenced for vSAN (there is an additional license required which can be entered via Cluster>Configure>vSAN Cluster>Assign License).

A common NTP source is configured on all hosts in the cluster (using the lab AD Domain Controller, which gets its NTP in turn from the Cisco Router providing external internet access).

Categories
VMware vSAN

homelab vSAN on vSphere 7.0 – Part 2 (Hardware Config)

For my vSAN instance I’m using 3 HP Gen 8 Microservers which form my NSX for vSphere lab cluster. The spec for all 3 nodes is:

CPU: Xeon E3-1265L v2 (Ivy Bridge)
16Gb RAM,
20TB HDDs
(3xWD Red 6TB for vSAN, 1x WD Blue 2TB for local storage )
256Gb Samsung 860 EVO SSD
HPE QLogic 57810s 2x10Gb NIC
Broadcom (onboard) 2x1Gb NIC

I have these NICs connected to two switches – a Cisco 3750G (which acts as my management switch and is always on) and a Cisco 4900M (which provides 10Gb switchports and is powered on when I’m using my lab). The two switches are connected together via 4x1Gb trunks and share the same common VLANs.

The benefit of using this particular model of HP Microserver as a platform is that although it isn’t officially listed as supported on the vSphere 7 HCL, all hardware works with vSphere 7 out of the box with no modifications.

Categories
VMware vSAN

homelab vSAN on vSphere 7.0 – Part 1 (Requirements)

In this series of posts, I’m going to run through the setup of my homelab vSAN instance.

vSAN is VMware’s virtual SAN technology, that takes storage from vSphere hosts and aggregates it into the form of logical storage that can be accessed collectively across these hosts.

This storage can be all flash, or a mixture of disk and flash (hybrid).

There are various considerations and requirements for vSAN which I’m going to run through as part of this series.

Requirements

In order to deploy vSAN, there are a number of requirements that need to be met:

Capacity Disk(s) – At least drive per host for storage of data. If you’re looking at a hybrid vSAN this can be a hard drive, if you want all-flash it needs to be an SSD.


Caching Disks/SSDs – An SSD per host for caching of data. In a production deployment this cache drive should be at least 10% of the anticipated storage on the capacity disks.

Memory – Running vSAN requires memory footprint per host, however the amount required is not fixed and depends on a number of factors (size of caching tier, capacity tier, number of disks, vSAN mode and so on). There’s a helpful VMware KB Article that runs through the various factors that influence this memory requirement.

Networking – For a hybrid vSAN, 1Gb/sec networking is fine, but to get the most out of a flash configuration, 10Gb/sec is recommended.

Hosts/Nodes – A standard vSAN cluster must contain a minimum of 3 hosts that contribute storage capacity to the cluster.